4
Open your 06 Translations_last name.ai {This was your Final file} from the previous project and do a “save as” and name it 07 Color Translations_Guide_last name.
- This is the file you will use for the next step 6.
- You will keep this file open for all the remaining steps, as you will be copying and pasting from it!
5
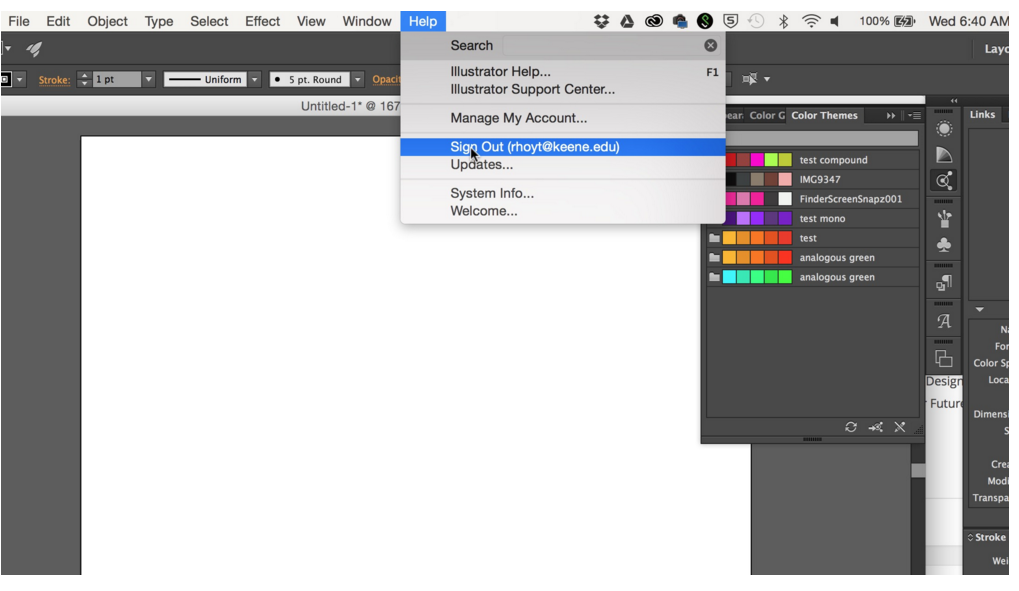
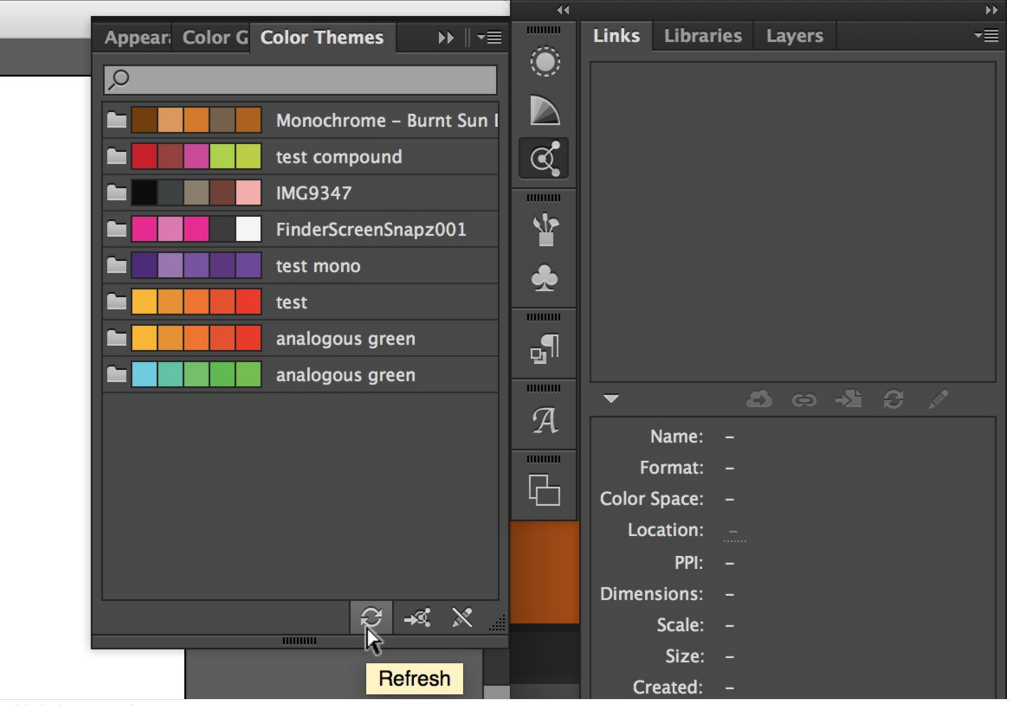
Open Illustrator and sign in with your Adobe account in the Help menu. Your colors should appear in the Color — “color themes” panel under the “window menu”. Press the Refresh button to update the panel.
6
Build a new ‘color translation’ illustrator file.
- Create a new 6″x6″ Illustrator file and name it 07 Color Translations_last name.ai
- On your layers palette, rename the background layer “photo”. (This will actually be on the bottom and you will eventually turn it off once done lining up all other layers over it)
-Create a second layer and name it “box”.
-Create a third layer and name it “bottom”.
-Create a fourth layer and name it “top”.
-Create a fifth and final layer and name it “text”.
You should have 5 total layers, looking from bottom to top named: photo, box, bottom, top, text. Example in order of how you will view it in layers palette:
•text
•top
•bottom
•box
•photo
Text layer will be at top and photo layer will be at bottom.
- Copy and paste your original photograph to the ‘photo’ layer for positioning.
(I would go to your final 07 Color Translations_Guide_last name file and copy the exact picture from that file on artboard #1 using the black arrow, seeing it is the exact size and what you have used 8 times already.) - Create a 6 x 6 solid background square with the rectangle box tool, holding down your shift key to fill whole artboard. This will be on the “box” layer.
- Go to your 07 Color Translations_Guide_last name.ai file (both of these files should be open as tabs because you will be copying and pasting from one file into the other file for the rest of this assignment) and with your black arrow, “click and drag” around the whole image of your translation on each individual artboard (except #1) and then choose “Group” or command-G so that all the individual pieces will select as one. I would do this to all artboards right now just so they are done for the future.
- Then choose, with the black arrow, one of the translations #2-#8 and choose “copy”. YOU ARE NOT ALLOWED TO USE ARTBOARD #1 FOR ANY OF THE FOLLOWING STEPS!
- Go back to your 07 Color Translations–last name file and choose “Paste” onto the “bottom layer”.
- You will probably have to “turn the eye off” on the box layer so that you can see your photo and line up your translation over it exactly. Keep this box layer turned off for now.
- Go back to your 07 Color Translations_Guide_last name.ai file (both of these files should be open as tabs because you will be copying and pasting from one file into the other file for the rest of this assignment) and with your black arrow, choose a different translation #2-#8 and choose “copy”.
- Go back to your 07 Color Translations–last name file and choose “Paste” onto the “top layer”. Line this up exactly over the original photo on the photo layer.
- You have now lined up 2 different translations on top of each other!
- Now onto choosing colors!!!!!
7
Here is the overall concept. Read carefully. You DO/COMPLETE this in Step #8 below! BUT THIS IS THE CONCEPT OF WHAT YOU WILL BE DOING NEXT!!!!!
Using only two colors for images and one color for background box, create a series of color translations using each of the color types as follows:
- 4 Different Analogous
- 4 Different Monochromatic
- 4 Different Triad
- 4 Different Complimentary
- 4 Different Compound
- Use a combination of two types of translations for each set. Each set of 4 must use the same two translations.
Example 1: Use translations #2 and #6 as its overlay, and choose 3 of the 5 analogous colors for the: background box, #2 and #6 layers.
Example 2: Use translations #4 and #7 as its overlay, and choose 3 of the 5 monochromatic colors for the: background box, #4 and #7 layers.
Example 3: Use translations #3 and #5 as an overlay, and choose 3 of the 5 triad colors for the: background box, #3 and #5 layers.
Example 4: Use translations #2 and #8 as an overlay, and choose 3 of the 5 triad colors for the: background box, #2 and #8 layers. - Can only use a translation (#2-#8) twice throughout all of the 5 rows. In other words, you can’t put translation #2 silhouette as the bottom layer on each of your 20 color translations because you want to or because it looks good. Only twice!
8
You now have 1 artboard with 5 layers! This is all in black and white at the moment!
Each of your color themes has 5 colors in them. Using only TWO colors for the two translation images and ONE color for the background box, create a series of color translations using each of the color themes as follows (Yes, 2 colors won’t be used out of the 5 for now):
- Analogous
- Monochromatic
- Triad
- Complimentary
- Compound
- Turn back on your “box layer”. Click the eyeball on.
- Click on the 6×6 box with your black arrow.
- Choose one of the 5 colors from the analogous theme.
- Click on the image on the bottom layer.
- Choose a different 1 of the 5 colors from the analogous theme.
- Click on the image on the top layer.
- Choose a different 1 of the 5 colors from the analogous theme.
- You now have a translation done using 3 different colors from the 5 available in the analogous color theme.
- Choose your artboard tool from the toolbox and Option-Drag this artboard 3 more times, for a total of four artboards.
- Choose your black arrow and change the colors on the box, bottom and top layers differently than your first artboard. Same translations, just different combinations of the same color theme.
- Once you have four artboards in different colors from the analogous theme, you need to choose your artboard tool again from the toolbox and Option-drag the 4th artboard to make a 5th.
- I would place this directly under artboard #1.
- You will now go back to Step #6-12 in Part #6 up above and repeat the same action you did for artboard #1 here in this file.
- You MUST USE 2 TOTALLY DIFFERENT TRANSLATIONS TO OVERLAY ON TOP OF ONE ANOTHER for this 2nd row! You have 7 to choose from, so change it up!
- Once you have one artboard done (this is now artboard #5) in black& white, repeat #’s 1-8 in this step #8. Only difference is you are now choosing colors from the Monochromatic color theme!
- After you have this artboard #5 done, repeat steps #9-10.
- Once you have four artboards in different colors from the monochromatic theme, you need to choose your artboard tool again from the toolbox and Option-drag the 8th artboard to make a 9th.
- I would place this directly under artboard #5.
- You will now go back to Step #6-12 in Part #6 up above and repeat the same action you did for artboard #1 and #4 here in this file.
- You MUST USE 2 TOTALLY DIFFERENT TRANSLATIONS TO OVERLAY ON TOP OF ONE ANOTHER for this 2nd row! You have 7 to choose from, so change it up!
- Once you have one artboard done (this is now artboard #9) in black& white, repeat #’s 1-8 in this step #8. Only difference is you are now choosing colors from the Triad color theme!
- After you have this artboard #9 done, repeat steps #9-10.
- Once you have four artboards in different colors from the triad theme, you need to choose your artboard tool again from the toolbox and Option-drag the 12th artboard to make a 13th.
- I would place this directly under artboard #9.
- an so on, and so on, and so on…….. until you end up with a total of 20 artboards!
- Each horizontal row will have 4 artboards on them.
- Each horizontal row will have a different color theme assigned to it.
- Eventually you will have 5 rows of four = 20 total artboards.
9
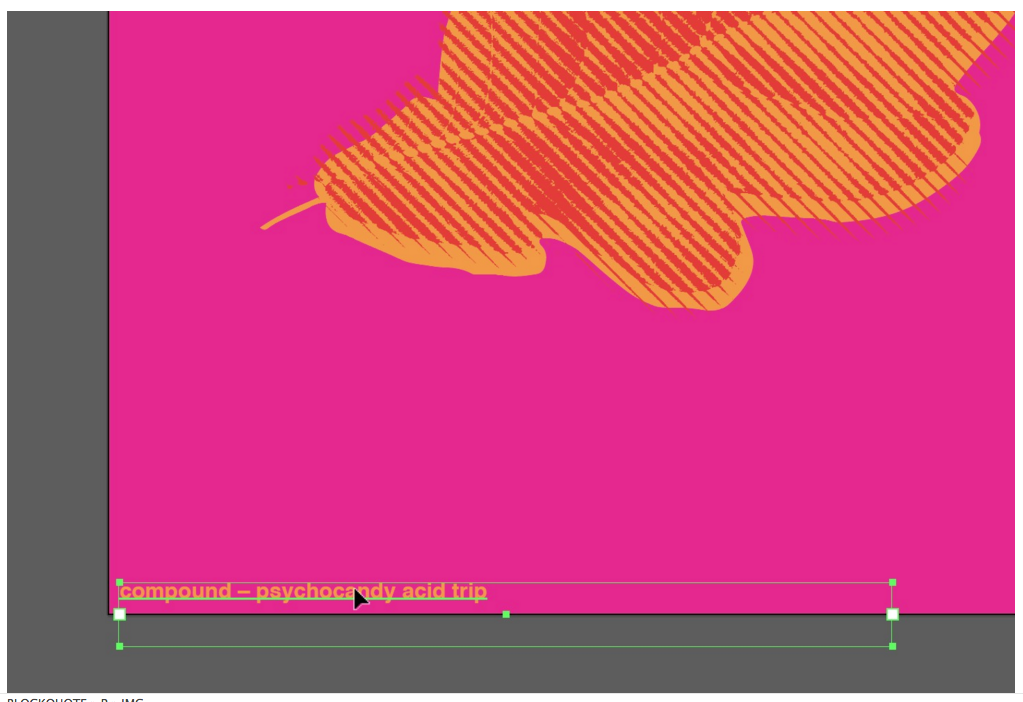
Put the full name of each color theme on the bottom left corner of each design. The type should be colored with one of the theme colors used on the “bottom” or “top” layers (not black or white) and set as follows:
- font: Helvetica Bold
- size: 7pt
- color: according to theme and chosen either from the “bottom” or “top” layer colors used.
- See example below: compound-psychocandy acid trip
10
Make a total of 20 color translations — 4 for each type of color (analogous, complimentary, etc.) organized in illustrator and saved in Illustrator as 07 Color Translations_last name.ai.
Also export these as one PDF titled 07 Color Translations _last name.pdf
Due Thursday, April 8th
- Read and comment to the Color Readings page. Place in the category 07 Color.
Due Tuesday, April 13th –
- A total of 20 color translations done to be critiqued onscreen only. Name them as follows:
07 Color Translations_lastname.ai - One PDF with a total of 20 color translations posted to DropBox before class. Name them as follows:
07 Color Translations_lastname.pdf
Due Thursday, April 15th
- One PDF with a total of 20 color translations posted to DropBox before class .
- Name it as follows:
07 Color Translations FINAL_lastname.pdf